
홈서버로 메일 서버 구축(1) - Ubuntu + Squarespace + certbot + postfix + dovecot
메일 서버를 구축해봅시다 ✉️
홈서버도 있고, 도메인도 있고, 웹페이지도 호스팅 하고 있으니 다음으로 해볼 것은 메일 서버입니다!
요즘에는 구글 워크스페이스를 이용해서 계정을 생성하곤 하는데요, 이 경우가 관리도 쉽고 구글에서 제공하는 서비스들도 누릴 수 있어서 사실 좀 더 많이 편하긴 합니다.
하지만, 서버와 네트워크를 공부하기 위해선 직접 전부 해보는 경험이 중요하다고 생각했어요.
그리고 아직은 해당 메일을 업무용으로 사용하진 않을 계획이었습니다.
그래서 직접 서버를 구축하고 인증서를 발급하고, DNS 레코드를 연결해보고, 모든 보안 과정을 수행해보았습니다.
사실 가난한 대학생인 저에겐 구글 워크스페이스 월정액이 비쌌습니다 1년에… 10만원 정도…
이 포스트에서는 서버 구축, 인증서 발급, 그에 따른 DNS 레코드 연결까지 작성해보겠습니다.
다음 포스트에서 메일 보안 과정을 작성해둘게요!
선수 지식 🧐
메일 서버를 구축하기 전에, 메일 서버가 어떤 방식으로 작동하는지 알아봅시다 :)
사실 이 내용은 정말 많은 분들이 자세히 적어두셨더라구요.
저는 리눅스 서버 보안 (나카지마 요시카즈)를 기반으로 여러 자료들을 참고해서 작성해보겠습니다.
1. 소프트웨어
1) MUA(Mail User Agent)
- 메일 클라이언트 소프트웨어
- 메일 박스에 도착한 메일을 MUA를 통해 열어볼 수 있습니다.
2) MTA(Message Transfer Agent)
- 일반적으로 메일 서버라고 불리는 소프트웨어
- MUA에서 작성한 메일을 받고, 사용자의 메일함에 메일을 전송합니다.
- SMTP 프로토콜을 이용하여, SMTP 서버라고 불리기도 합니다.
3) MDA(Mail Delivery Agent) - MTA가 MUA를 통해 받은 메일을 사용자의 메일함에 전송하는 소프트웨어 - 로컬 전송 프로그램
2. 프로토콜
메일과 관련된 프로토콜은 총 3가지가 있습니다.
1) SMTP(Simple Mail Transfer Protocol)
- 25번 포트 사용
    - TLS 암호화를 사용한 경우 587번 포트 사용
- MUA -> MTA / MTA(송신) -> MTA(수신)의 경우 사용되는 프로토콜입니다.
2) POP3(Post Office Protocol ver 3)
- 110번 포트 사용
    - SSL 암호화를 사용한 경우 995번 포트 사용
- 메일함 -> MUA(수신)의 경우 사용되는 프로토콜입니다.
- 메일을 로컬에 다운로드하고, 서버에서 삭제합니다.
3) IMAP(Internet Message Access Protocol)
- 143번 포트 사용
    - SSL 암호화를 사용한 경우 993번 포트 사용
- 메일함 -> MUA(수신)의 경우 사용되는 프로토콜입니다.
    - POP3와 역할이 같습니다.
- 메일을 로컬에 다운로드하지 않고, 메일 서버에 둔 채로 작업합니다.
    - 따라서, 여러 기기에서 동일한 메일함 상태를 유지할 수 있습니다.
메일 송수신 과정을 그림으로 그리면 아래와 같습니다.
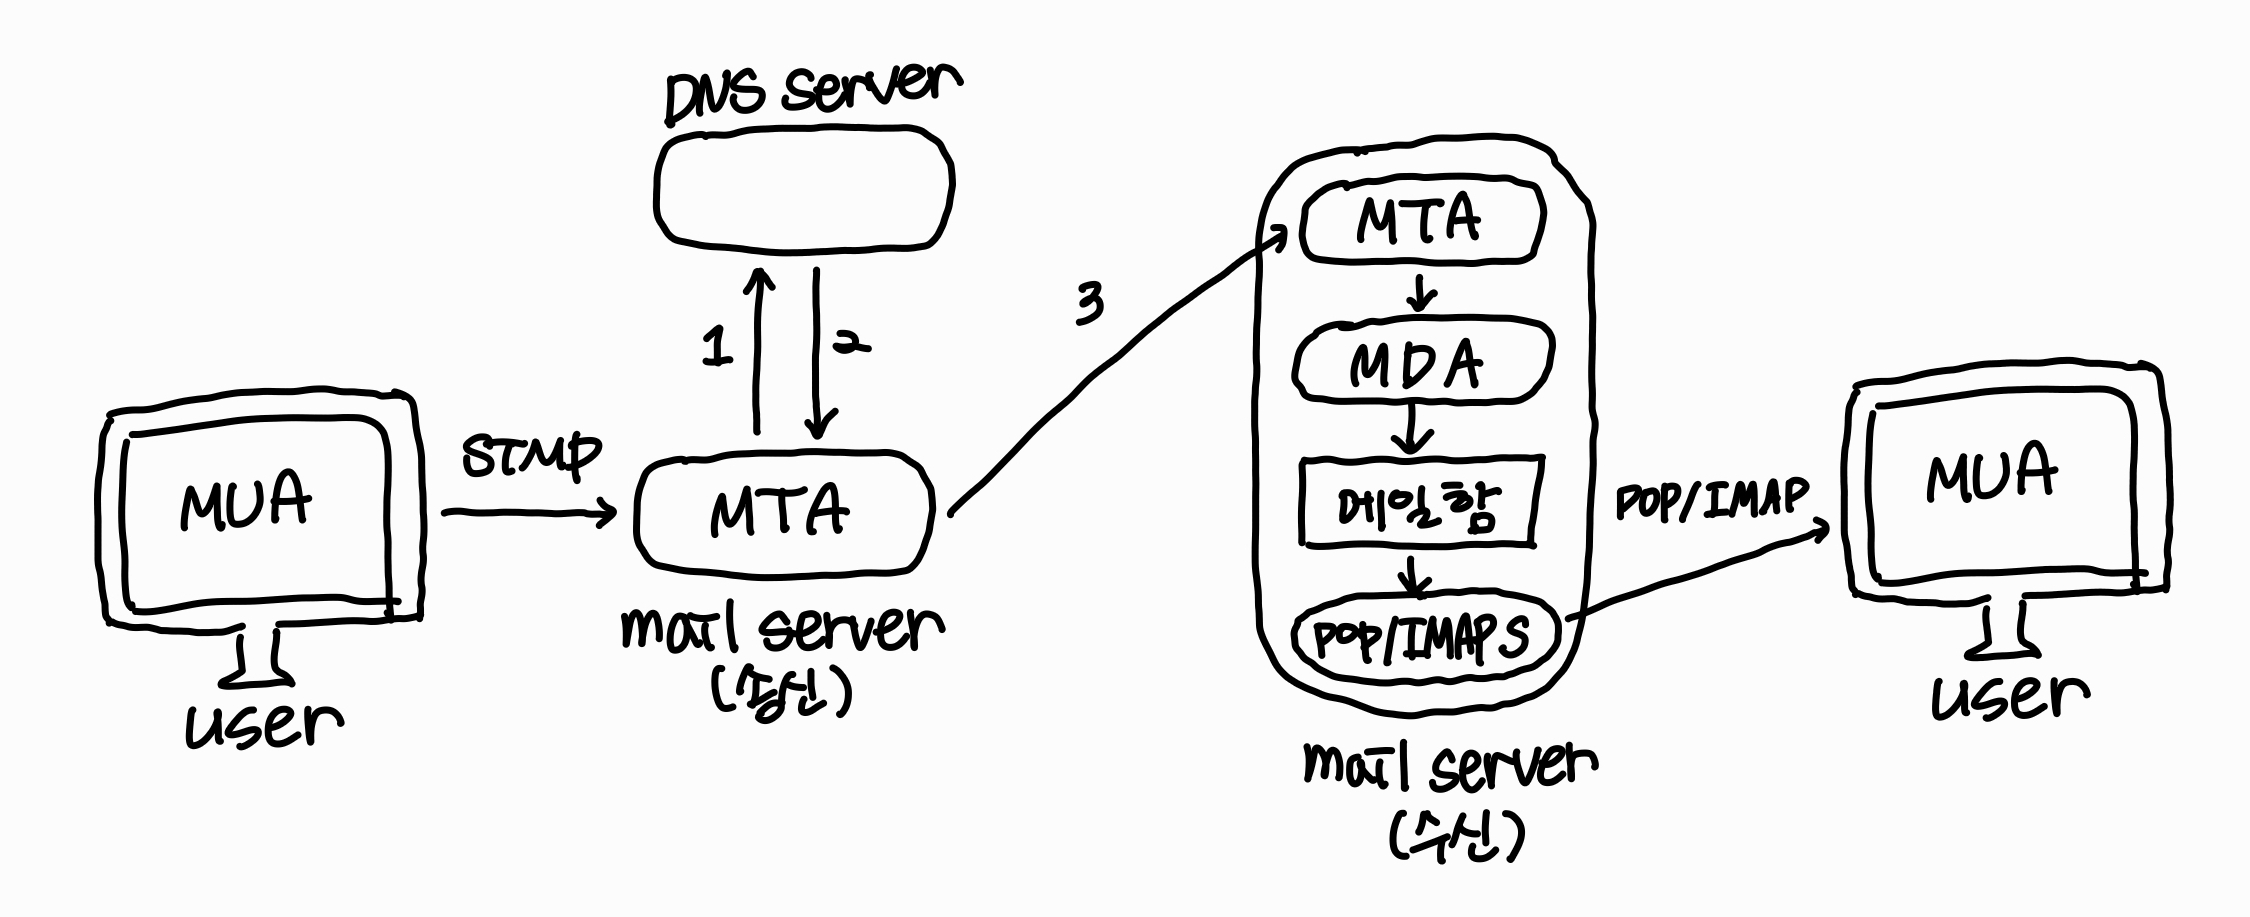
사용자가 메일을 MUA를 통해 작성하면 해당 메일을 MTA가 받고, DNS 서버에서 MX 레코드를 참조하여 메일을 보낼 서버의 MTA를 확인합니다.
이후, MTA(송신)는 MTA(수신)에 메일을 전송하고 MTA(수신)은 MDA를 통해 메일함에 메일을 전송합니다.
최종적으로 POP/IMAP 서버를 통해 메일함으로부터 메일을 받습니다.
메일 서버 구축하기 📬
0. 환경 ⚙️
그럼 이제 환경을 구성해봅시다!
우선, 제가 선택한 도메인 등록 기관은 Squarespace 입니다.
원래 구글 도메인을 사용하려고 했었는데, Squarespace가 구글 도메인을 인수하면서 Squarespace가 구글 도메인에서 관리하는 도메인의 등록기관이 되었습니다.
그래서 구글 워크스페이스 등의 구글에서 제공하는 서비스들과 연결하기 용이하게 구성되어 있어요.
그런데 문제는 국내에서 Squarespace를 사용하는 경우 DNS 레코드를 등록하는 등의 도메인 관리 관련 튜토리얼이 적다는 것입니다.
Squarespace가 도메인 등록도 가능하지만, 웹사이트 구축 및 호스팅이 주력인 서비스라 웹사이트 구축 관련으로 튜토리얼이 많더라고요.
그래서, Squarespace에서 어떻게 레코드를 구성해야 하는지도 추가해서 적을 예정입니다!
그리고, SSL/TLS 인증서는 certbot을 통해 발급 받을 거에요.
MTA로는 posfix, POP3/IMAP 서버로는 Dovecot을 사용해줄겁니다!
MUA는 취향껏 고르시면 되는데요, 저는 Thunderbird를 사용했어요. 많은 사람들이 사용하는 것 같더라고요.
사용하는 버전
certbot 2.9.0
postfix 3.8.6
dovecot 2.3.21
자, 그러면 이제 공유기 포트포워딩을 해줍시다!
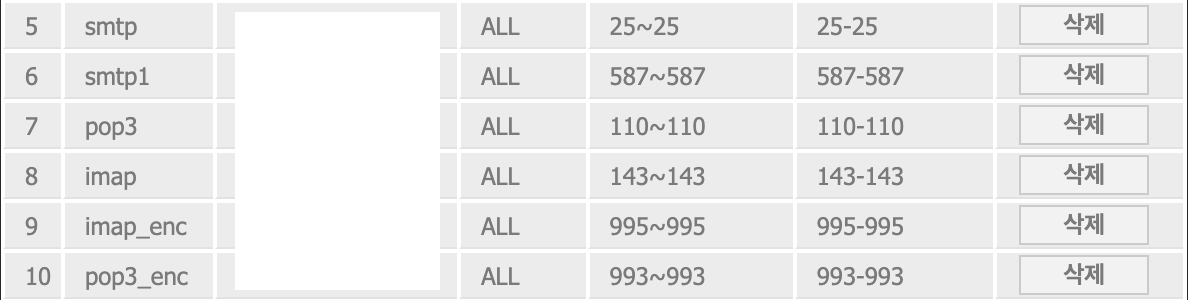
사실 저는 규칙명을 잘못 적었어요…
993번과 995번은 반대로 적어야 합니다.
다른 튜토리얼 보고 포트포워딩 해줬는데, 공부해보니 반대더라고요.
근데 사실 큰 영향은 없어서 괜찮습니다. 그냥 별명 같은 거여서요.
아무튼, pop3s가 995번 imaps가 993번입니다!
| 프로토콜 | 포트 | 설명 |
|---|---|---|
| SMTP | 587 | 메일 발신 (STARTTLS) |
| IMAPS | 993 | IMAP over SSL |
| POP3S | 995 | POP3 over SSL |
그리고 서버에서 방화벽도 열어줍시다.
저 포트들 다 열어주면 됩니다.
sudo ufw allow 587/tcp
이런 식으로 열어주면 됩니다.
그리고, 도메인 등록 기관에 접속해서 DNS 레코드를 설정해줍니다.
현재 단계에서는 2개의 레코드를 추가하면 됩니다.
| Host | Type | Priority | TTL | Data |
|---|---|---|---|---|
| @ | MX | 10 | 4 hrs | mail.[yourdomain] |
| A | N/A | 4 hrs | [공인 IP] |
위의 MX 레코드는 mail.[yourdomain]을 제가 구매한 도메인의 메일 서버로 지정해주는 설정이고, A 레코드는 mail.[yourdomain]이 서버의 공인 IP를 가리키도록 하는 설정입니다.
정리하면, mail.[yourdomain] 서버로 메일을 받고, 이 도메인은 제 공인 IP를 가리키게됩니다.
1. etc/hosts 설정 🤓
/etc/hostname 수정
mail
/etc/hosts 수정
127.0.0.1 localhost
127.0.1.1   mail.swlee.net mail # 이 줄을 추가

# The following lines are desirable for IPv6 capable hosts
::1     ip6-localhost ip6-loopback
fe00::0 ip6-localnet
ff00::0 ip6-mcastprefix
ff02::1 ip6-allnodes
ff02::2 ip6-allrouters
이렇게 하면 sewon@mail이 되던데 이거 사실 안해도 되는 것 같긴 하지만 일단 저렇게 했더니 굴러가서 냅두는 중입니다.
수정 안해도 작동하는지는 확인을 한 번 해봐야 할 것 같아요.
튜토리얼 따라한거라 일단 나중에 한 번 알아보겠습니다.
2. Postfix 설정 📨
postfix를 깔아줍니다.
sudo apt install postfix
설치하게 되면 구성 마법사가 등장하는데 아래와 같이 입력해줍니다.
General type of mail configuration: Internet Site 선택 System mail name: 메일 서버의 도메인 이름 입력 (예: [yordomain].com)
그리고, 저는 저번에 https 설정하면서 발급 받았던 인증서가 있어서 해당 인증서로 SSL/TSL 인증을 해줄겁니다.
이제 postfix 구성 파일을 수정해봅시다.
앞으로 모든 구성 파일은 전문을 추가해둘 예정입니다.
제가 튜토리얼을 보면서 가장 헷갈렸던 부분이 수정을 해야하는 부분을 찾는 것이었는데요, 전문을 추가하게 되면 수정 위치를 찾는 것이 더욱 편리할 것 같아서 가독성은 조금 떨어지더라도 파일 전문을 넣어두겠습니다.
전문을 넣기에는 주석이 너무 많은 경우는 라인 번호를 기입해두겠습니다.
sudo vi /etc/postfix/main.cf로 편집해줍시다.
# See /usr/share/postfix/main.cf.dist for a commented, more complete version


# Debian specific:  Specifying a file name will cause the first
# line of that file to be used as the name.  The Debian default
# is /etc/mailname.
#myorigin = /etc/mailname

smtpd_banner = $myhostname ESMTP $mail_name (Ubuntu)
biff = no

# appending .domain is the MUA's job.
append_dot_mydomain = no

# Uncomment the next line to generate "delayed mail" warnings
#delay_warning_time = 4h

readme_directory = no

# See http://www.postfix.org/COMPATIBILITY_README.html -- default to 3.6 on
# fresh installs.
compatibility_level = 3.6

# TLS parameters
#smtpd_tls_cert_file=/etc/ssl/certs/ssl-cert-snakeoil.pem
#smtpd_tls_key_file=/etc/ssl/private/ssl-cert-snakeoil.key
smtpd_tls_security_level=may

#smtp_tls_CApath=/etc/ssl/certs
smtp_tls_security_level=may
smtp_tls_session_cache_database = btree:${data_directory}/smtp_scache
smtpd_tls_session_cache_database = btree:${data_directory}/smtpd_scache

smtpd_relay_restrictions = permit_mynetworks permit_sasl_authenticated defer_unauth_destination
# host & domain 호스트 및 도메인 설정
myhostname = mail.[yourdomain]
mydomain = [yourdomain]
alias_maps = hash:/etc/aliases
alias_database = hash:/etc/aliases
myorigin = $mydomain

# mail reception domain 메일 수신 도메인 설정
mydestination = $myhostname, localhost.$mydomain, localhost, $mydomain
relayhost =

# 신뢰할 수 있는 network
mynetworks = 127.0.0.0/8

#[::ffff:127.0.0.0]/104 [::1]/128

# mailbox 홈 디렉토리 메일함 사용
home_mailbox = Maildir/

mailbox_size_limit = 0
recipient_delimiter = +

# network
inet_interfaces = all
inet_protocols = all

# STMP 설정
smtpd_sasl_type = dovecot
smtpd_sasl_path = private/auth
smtpd_sasl_auth_enable = yes

# TLS 설정
# 인증서 경로
smtpd_tls_cert_file = /etc/letsencrypt/live/[yourdomain]/fullchain.pem
smtpd_tls_key_file = /etc/letsencrypt/live/[yourdomain]/privkey.pem
smtpd_use_tls = yes
smtpd_tls_auth_only = yes

# 수신 제한 (인증된 사용자만 메일 발송 가능)
smtpd_recipient_restrictions = permit_sasl_authenticated, reject_unauth_destination
이렇게 설정해주면 됩니다.
대신 이 때 꼭 주의해야할 점이 주석을 옆에 적으시면 오류가 발생해 제대로 인식하지 못합니다!!
그러니 주석은 꼭 위에 적어주세요.
다음으로는 sudo vi /etc/postfix/master.cf 를 수정해봅시다.
아래 코드를 보시고, 주석 해제를 시켜주면 됩니다.
#
# Postfix master process configuration file.  For details on the format
# of the file, see the master(5) manual page (command: "man 5 master" or
# on-line: http://www.postfix.org/master.5.html).
#
# Do not forget to execute "postfix reload" after editing this file.
#
# ==========================================================================
# service type  private unpriv  chroot  wakeup  maxproc command + args
#               (yes)   (yes)   (no)    (never) (100)
# ==========================================================================
smtp      inet  n       -       y       -       -       smtpd
#smtp      inet  n       -       y       -       1       postscreen
#smtpd     pass  -       -       y       -       -       smtpd
#dnsblog   unix  -       -       y       -       0       dnsblog
#tlsproxy  unix  -       -       y       -       0       tlsproxy
# Choose one: enable submission for loopback clients only, or for any client.
#127.0.0.1:submission inet n -   y       -       -       smtpd
submission inet n       -       y       -       -       smtpd
  -o syslog_name=postfix/submission
  -o smtpd_tls_security_level=encrypt
  -o smtpd_sasl_auth_enable=yes
#  -o smtpd_tls_auth_only=yes
#  -o local_header_rewrite_clients=static:all
#  -o smtpd_reject_unlisted_recipient=no
#     Instead of specifying complex smtpd_<xxx>_restrictions here,
#     specify "smtpd_<xxx>_restrictions=$mua_<xxx>_restrictions"
#     here, and specify mua_<xxx>_restrictions in main.cf (where
#     "<xxx>" is "client", "helo", "sender", "relay", or "recipient").
#  -o smtpd_client_restrictions=
#  -o smtpd_helo_restrictions=
#  -o smtpd_sender_restrictions=
#  -o smtpd_relay_restrictions=
  -o smtpd_recipient_restrictions=permit_sasl_authenticated,reject
  -o milter_macro_daemon_name=ORIGINATING
# Choose one: enable submissions for loopback clients only, or for any client.
#127.0.0.1:submissions inet n  -       y       -       -       smtpd
submissions     inet  n       -       y       -       -       smtpd
  -o syslog_name=postfix/submissions
  -o smtpd_tls_wrappermode=yes
  -o smtpd_sasl_auth_enable=yes
#  -o local_header_rewrite_clients=static:all
#  -o smtpd_reject_unlisted_recipient=no
#     Instead of specifying complex smtpd_<xxx>_restrictions here,
#     specify "smtpd_<xxx>_restrictions=$mua_<xxx>_restrictions"
#     here, and specify mua_<xxx>_restrictions in main.cf (where
#     "<xxx>" is "client", "helo", "sender", "relay", or "recipient").
#  -o smtpd_client_restrictions=
#  -o smtpd_helo_restrictions=
#  -o smtpd_sender_restrictions=
#  -o smtpd_relay_restrictions=
  -o smtpd_recipient_restrictions=permit_sasl_authenticated,reject
  -o milter_macro_daemon_name=ORIGINATING
설정이 끝났다면, systemctl restart postfix로 재실행 시켜줍니다.
3. Dovecot 설정 📬
Dovecot은 SMTP 인증을 처리하고, POP3/IMAP 프로토콜을 통한 메일 수신 기능을 담당합니다.
dovecot을 설치해줍시다.
sudo apt install dovecot-core dovecot-imapd dovecot-pop3d
설정을 시작해봅시다.
sudo vi /etc/dovecot/conf.d/10-master.conf 설정 파일부터 수정해봅시다!
#default_process_limit = 100
#default_client_limit = 1000

# Default VSZ (virtual memory size) limit for service processes. This is mainly
# intended to catch and kill processes that leak memory before they eat up
# everything.
#default_vsz_limit = 256M

# Login user is internally used by login processes. This is the most untrusted
# user in Dovecot system. It shouldn't have access to anything at all.
#default_login_user = dovenull

# Internal user is used by unprivileged processes. It should be separate from
# login user, so that login processes can't disturb other processes.
#default_internal_user = dovecot

# 포트 활성화
service imap-login {
  inet_listener imap {
    port = 143
  }
  inet_listener imaps {
    port = 993
    ssl = yes
  }

  # Number of connections to handle before starting a new process. Typically
  # the only useful values are 0 (unlimited) or 1. 1 is more secure, but 0
  # is faster. <doc/wiki/LoginProcess.txt>
  #service_count = 1

  # Number of processes to always keep waiting for more connections.
  #process_min_avail = 0

  # If you set service_count=0, you probably need to grow this.
  #vsz_limit = $default_vsz_limit
}

service pop3-login {
  inet_listener pop3 {
    #port = 110
  }
  inet_listener pop3s {
    #port = 995
    #ssl = yes
  }
}

service submission-login {
  inet_listener submission {
    #port = 587
  }
  inet_listener submissions {
    #port = 465
  }
}

service lmtp {
  unix_listener lmtp {
    #mode = 0666
  }

  # Create inet listener only if you can't use the above UNIX socket
  #inet_listener lmtp {
    # Avoid making LMTP visible for the entire internet
    #address =
    #port =
  #}
}

service imap {
  # Most of the memory goes to mmap()ing files. You may need to increase this
  # limit if you have huge mailboxes.
  #vsz_limit = $default_vsz_limit

  # Max. number of IMAP processes (connections)
  #process_limit = 1024
}

service pop3 {
  # Max. number of POP3 processes (connections)
  #process_limit = 1024
}

service submission {
  # Max. number of SMTP Submission processes (connections)
  #process_limit = 1024
}

service auth {
  # auth_socket_path points to this userdb socket by default. It's typically
  # used by dovecot-lda, doveadm, possibly imap process, etc. Users that have
  # full permissions to this socket are able to get a list of all usernames and
  # get the results of everyone's userdb lookups.
  #
  # The default 0666 mode allows anyone to connect to the socket, but the
  # userdb lookups will succeed only if the userdb returns an "uid" field that
  # matches the caller process's UID. Also if caller's uid or gid matches the
  # socket's uid or gid the lookup succeeds. Anything else causes a failure.
  #
  # To give the caller full permissions to lookup all users, set the mode to
  # something else than 0666 and Dovecot lets the kernel enforce the
  # permissions (e.g. 0777 allows everyone full permissions).
  #unix_listener auth-userdb {
   # mode = 0666
   # user =
   # group =
  #}

  # 여기를 수정해줍니다.
  # Postfix smtp-auth
  unix_listener /var/spool/postfix/private/auth {
    mode = 0660
    user = postfix
    group = postfix
  }

  # Auth process is run as this user.
  #user = $default_internal_user
}

service auth-worker {
  # Auth worker process is run as root by default, so that it can access
  # /etc/shadow. If this isn't necessary, the user should be changed to
  # $default_internal_user.
  #user = root
}

service dict {
  # If dict proxy is used, mail processes should have access to its socket.
  # For example: mode=0660, group=vmail and global mail_access_groups=vmail
  unix_listener dict {
    #mode = 0600
    #user =
    #group =
  }
}
sudo vi /etc/dovecot/conf.d/10-auth.conf 이번에는 인증방법 설정 파일을 수정해봅시다.
한글 주석이 달려 있는 부분만 수정해주시면 됩니다.
##
## Authentication processes
##

# Disable LOGIN command and all other plaintext authentications unless
# SSL/TLS is used (LOGINDISABLED capability). Note that if the remote IP
# matches the local IP (ie. you're connecting from the same computer), the
# connection is considered secure and plaintext authentication is allowed.
# See also ssl=required setting.

# 평문 인증 비활성 옵션 설정
disable_plaintext_auth = no

# Authentication cache size (e.g. 10M). 0 means it's disabled. Note that
# bsdauth and PAM require cache_key to be set for caching to be used.
#auth_cache_size = 0
# Time to live for cached data. After TTL expires the cached record is no
# longer used, *except* if the main database lookup returns internal failure.
# We also try to handle password changes automatically: If user's previous
# authentication was successful, but this one wasn't, the cache isn't used.
# For now this works only with plaintext authentication.
#auth_cache_ttl = 1 hour
# TTL for negative hits (user not found, password mismatch).
# 0 disables caching them completely.
#auth_cache_negative_ttl = 1 hour

# Space separated list of realms for SASL authentication mechanisms that need
# them. You can leave it empty if you don't want to support multiple realms.
# Many clients simply use the first one listed here, so keep the default realm
# first.
#auth_realms =

# Default realm/domain to use if none was specified. This is used for both
# SASL realms and appending @domain to username in plaintext logins.
#auth_default_realm =

# List of allowed characters in username. If the user-given username contains
# a character not listed in here, the login automatically fails. This is just
# an extra check to make sure user can't exploit any potential quote escaping
# vulnerabilities with SQL/LDAP databases. If you want to allow all characters,
# set this value to empty.
#auth_username_chars = abcdefghijklmnopqrstuvwxyzABCDEFGHIJKLMNOPQRSTUVWXYZ01234567890.-_@

# Username character translations before it's looked up from databases. The
# value contains series of from -> to characters. For example "#@/@" means
# that '#' and '/' characters are translated to '@'.
#auth_username_translation =

# Username formatting before it's looked up from databases. You can use
# the standard variables here, eg. %Lu would lowercase the username, %n would
# drop away the domain if it was given, or "%n-AT-%d" would change the '@' into
# "-AT-". This translation is done after auth_username_translation changes.
#auth_username_format = %Lu

# If you want to allow master users to log in by specifying the master
# username within the normal username string (ie. not using SASL mechanism's
# support for it), you can specify the separator character here. The format
# is then <username><separator><master username>. UW-IMAP uses "*" as the
# separator, so that could be a good choice.
#auth_master_user_separator =

# Username to use for users logging in with ANONYMOUS SASL mechanism
#auth_anonymous_username = anonymous

# Maximum number of dovecot-auth worker processes. They're used to execute
# blocking passdb and userdb queries (eg. MySQL and PAM). They're
# automatically created and destroyed as needed.
#auth_worker_max_count = 30

# Host name to use in GSSAPI principal names. The default is to use the
# name returned by gethostname(). Use "$ALL" (with quotes) to allow all keytab
# entries.
#auth_gssapi_hostname =

# Kerberos keytab to use for the GSSAPI mechanism. Will use the system
# default (usually /etc/krb5.keytab) if not specified. You may need to change
# the auth service to run as root to be able to read this file.
#auth_krb5_keytab =

# Do NTLM and GSS-SPNEGO authentication using Samba's winbind daemon and
# ntlm_auth helper. <doc/wiki/Authentication/Mechanisms/Winbind.txt>
#auth_use_winbind = no

# Path for Samba's ntlm_auth helper binary.
#auth_winbind_helper_path = /usr/bin/ntlm_auth

# Time to delay before replying to failed authentications.
#auth_failure_delay = 2 secs

# Require a valid SSL client certificate or the authentication fails.
#auth_ssl_require_client_cert = no

# Take the username from client's SSL certificate, using
# X509_NAME_get_text_by_NID() which returns the subject's DN's
# CommonName.
#auth_ssl_username_from_cert = no

# Space separated list of wanted authentication mechanisms:
#   plain login digest-md5 cram-md5 ntlm rpa apop anonymous gssapi otp
#   gss-spnego
# NOTE: See also disable_plaintext_auth setting.

# IMAP 로그인 활성화
auth_mechanisms = plain login

##
## Password and user databases
##

#
# Password database is used to verify user's password (and nothing more).
# You can have multiple passdbs and userdbs. This is useful if you want to
# allow both system users (/etc/passwd) and virtual users to login without
# duplicating the system users into virtual database.
#
# <doc/wiki/PasswordDatabase.txt>
#
# User database specifies where mails are located and what user/group IDs
# own them. For single-UID configuration use "static" userdb.
#
# <doc/wiki/UserDatabase.txt>

#!include auth-deny.conf.ext
#!include auth-master.conf.ext

!include auth-system.conf.ext
#!include auth-sql.conf.ext
#!include auth-ldap.conf.ext
#!include auth-passwdfile.conf.ext
#!include auth-checkpassword.conf.ext
#!include auth-static.conf.ext
sudo vi /etc/dovecot/dovecot.conf 그리고 이 파일의 가장 하단에
protocols = pop3 imap
를 추가해줍니다.
sudo vi /etc/dovecot/conf.d/10-mail.conf 메일 설정 파일의 30번째 줄을
mail_location = maildir:~/Maildir
와 같이 수정해줍니다.
sudo vi /etc/dovecot/conf.d/10-ssl.conf ssl 설정 파일은 아래와 같이 수정해줍니다.
##
## SSL settings
##

# SSL/TLS support: yes, no, required. <doc/wiki/SSL.txt>

# 활성화
ssl = yes

# PEM encoded X.509 SSL/TLS certificate and private key. They're opened before
# dropping root privileges, so keep the key file unreadable by anyone but
# root. Included doc/mkcert.sh can be used to easily generate self-signed
# certificate, just make sure to update the domains in dovecot-openssl.cnf

# 인증서 경로
ssl_cert = </etc/letsencrypt/live/[yourdomain]/fullchain.pem
ssl_key = </etc/letsencrypt/live/[yourdomain]/privkey.pem

# If key file is password protected, give the password here. Alternatively
# give it when starting dovecot with -p parameter. Since this file is often
# world-readable, you may want to place this setting instead to a different
# root owned 0600 file by using ssl_key_password = <path.
#ssl_key_password =
sudo vi /etc/dovecot/conf.d/20-pop3.conf POP3 설정 파일의 50번째 줄을 주석 해제해줍니다.
pop3_uidl_format = %08Xu%08Xv
이렇게 설정이 끝났습니다.
postfix와 똑같이 systemctl restart dovecot로 재실행 시켜줍니다.
4. 메일 사용자 계정 생성 🙋
계정 생성을 할 건데, 그냥 유저를 추가해주면 됩니다.
useradd [계정명]
usermod -G mail [계정명]
usermod -s /usr/sbin/nologin [계정명]
passwd [계정명]
로 계정을 생성합니다.
이 때, 해당 유저는 메일 서버만 사용할 것이기 때문에 nologin 처리를 해서 가본 셸을 비활성화 해줍니다.
chown :mail /home
chmod 775 /home
마지막으로 권한 설정을 해주면 계정 생성은 끝입니다!
5. 메일 발송 테스트 📤
아래의 명령어를 입력해서 로컬 서버 내에서 메일이 잘 발송되는지 확인해봅시다!
sudo apt install mailutils
echo "This is a test mail." | mail -s "Test subject" [yourname]@gmail.com
그리고,
sudo tail -f /var/log/mail.log로 로그를 확인해줍니다.
문제가 발생하지 않았다면, 이제 메일 서버 구축은 끝입니다.
아직은 보안 과정이 진행되지 않아서 구글이나 네이버 등에서 스팸 처리를 하거나 메일 자체가 반려 될거예요.
다음 포스트에서 진행할 보안 과정까지 마무리하고 나면 메일을 자유롭게 송수신 할 수 있어요!!
참고 사이트 🔎
Postfix, dovecot, letsencrypt 를 이용한 메일서버 구축
이 사이트가 없었다면 저는 메일 서버를 구축할 수 없었을 거예요…
Ubuntu 기반 Postfix 메일 서버 구축 및 Java 연동
여기서는 postfix 구성 파일 관련해서 정보를 많이 얻었습니다.